Using the Rotation Editor |

|

|
|
Using the Rotation Editor |
|
|
Using the Rotation Editor |
|
|
|
Using the Rotation Editor |
|
|
You can view how-to videos for the Rotation Editor at http://snapplus.wisc.edu/news-help/how-to-videos/.
The Rotation Editor templates hold cropping and nutrient application data for each rotation you use in a SnapPlus farm. You can open the Rotation Editor in the Tools menu on the main navigation bar. You can also access it through the Rotation Wizard by selecting Add crops and application data to fields. On the next screen, click on the Edit Rotations button and the Rotation Editor will open.
Cropping data must be entered in order for the template to work properly with the Rotation Wizard, but nutrient applications do not need to be filled in. Application information can be added later when using the wizard if desired.
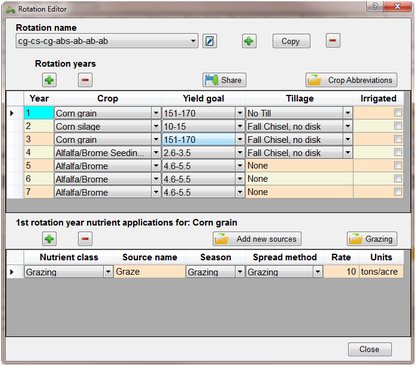
Use the Rotation Name dropdown list to select an existing rotation template. SnapPlus comes with a sample farm database that already has a sample rotation set up. Use the Use the Copy button to copy the current rotation to a new name. A new name will be assigned to the copy, but you can change it by typing in the dropdown list. The original rotation will remain and can be selected from the dropdown list. Use the |
![]() Sharing a rotation with other farms
Sharing a rotation with other farms
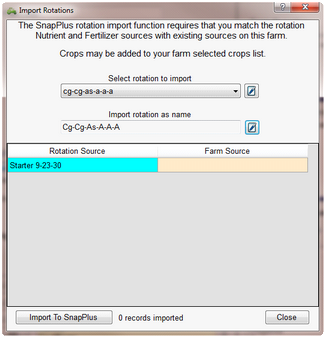
To use a current rotation that you have created with another farm, use the Share button located above the rotation list. First, you will be prompted for a Save As rotation name, if you want to change it. This dialog box can also be accessed by going to the Import/Export menu and selecting Rotations under the Export section. When you have the new farm open, from the Import/Export menu, select Rotations in the Import section. Then you can rename the rotation if you want. The information about the rotation and farm source will be displayed. If the information is correct, then click on the Import to SnapPlus button. Importing a rotation will add the rotation details to your farm and any subsequent editing of the rotation will not affect the rotation details in the original shared farm.
|
The The Fill in the Crop, Yield Goal, and Tillage cells using the dropdown lists. The crops that were selected on the Farm screen will appear in the dropdown. Check the box if irrigated. |
To add nutrient application data, first click on the Year in the Rotation Year table for the crop you want to add applications for. The year in rotation and crop name will be displayed above the Nutrient applications table, and the table will show any applications already entered for that year. The The The The |
Enter information from left to right in the table row. Nutrient Class: Choose the kind of material to apply from the dropdown list. See Nutrient Application Planner for more information. Source Name: Choose a nutrient source from the list of manure or fertilizer sources supplied in the dropdown list. Season: Choose from Fall, Winter, Spring or Summer. See Selecting the Season and Crop Year for Manure and Fertilizer Applications for more information about selecting the season. Spread Method: Make a choice from the dropdown selection. The contents of the dropdown list will vary depending on the type of material selected for application. Rate: Type in a rate appropriate to the material you have selected. For solid biosolid applications, those with units Dry Tons or Cu Yd, clicking on the rate cell will bring up the Biosolid Tons Calculator. Units: will automatically be filled in based on the material selected. This column cannot be edited. |