Using the Field Screen |

|

|
|
Using the Field Screen |
|
|
Using the Field Screen |
|
|
|
Using the Field Screen |
|
|
You can view how-to videos for the Field Screen at http://snapplus.wisc.edu/news-help/how-to-videos/.
When clicking on this tab for the first time for a farm, the following dialogue box will appear. Click on Yes if you have the import file for your soil test report. Importing them will greatly simplify data entry. All soil test reports after 2002 are available from the lab in electronic form. See Entering Fields via Soil Test Import
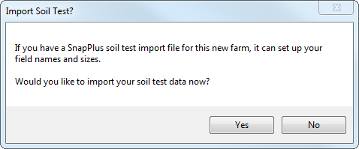
Click on No if you would like to enter the field data manually. Note: If you chose to enter the fields manually, you will need to make sure that field numbers in the SnapPlus file and the field numbers on your electronic soil test results match exactly or you may end up with field duplicates. Therefore it is highly recommended that you import the soil test results as a means of populating your field numbers in your field screen.
To add a field, click on the ![]() button, which will open a dialog box. At a minimum you must enter a valid field name. However, you can fill many necessary values. Areas that are marked with bold are required to run SnapPlus. To learn more about the filling in the data, see the column heading descriptions below.
button, which will open a dialog box. At a minimum you must enter a valid field name. However, you can fill many necessary values. Areas that are marked with bold are required to run SnapPlus. To learn more about the filling in the data, see the column heading descriptions below.
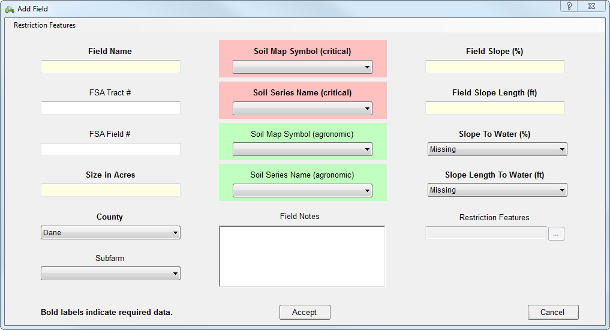
![]() General Field Table Information
General Field Table Information
The field grid is set to Multi-cell editing in columns you select by right-clicking your mouse on the column headers. A group of rows may be selected by clicking on a row header and while holding the mouse down, drag the cursor up or down until the desired group of cells is selected. Selected rows may be added or removed by holding the Ctrl key down when clicking on the row header. After selecting the proper rows containing the cells you wish to edit, you may right-mouse-click on the appropriate column header cell and an appropriate dialog box will be displayed to enter or select the new value. There is also a field navigation bar below the field drop down list and the right-click text has moved so total acres is visible on smaller resolutions.
|
All: Click on the word All to select all fields on the grid. To deselect all the cells, click on All again. To select an individual row, click in the box next to the field number.
Field Name: When entering field names manually, note that the new field is entered in the row above the highlighted row. If you have imported field names via the Soil Test Import function and you need to change the field name, click on the ![]() button in the field name cell to edit the field name.
button in the field name cell to edit the field name.
Active: Check or uncheck this box to indicate if the field is in use. No calculations will be run on fields that are not checked active. This is a way to keep records for fields that are out of production currently but may be returned to production at a later time.
DNR Winter: CAFO farms only. Check or uncheck this box to indicate that the DNR has approved this field for winter spreading.
Subfarm: These cells are optional, but will show a drop-down menu of any subfarms that you have created.
FSA Tract and FSA Field Number: These cells are optional.
Size (acres): Enter the size of the field in acres.
County: Select county in which the field is located from the pull-down menu.
Soil Map Symbol (critical): Select your dominant critical soil type, the most erodible soil type that covers at least 10% of the field. We recommend you use the SnapMaps website to view and optionally select the dominant critical soil.
Soil Series Name (critical): Selecting the Soil Map Symbol automatically fills in the Soil Name. Some soil map symbols represent “complexes” — they contain two or more soil series. If you chose a symbol representing a complex, the soil name cell will be blank. In these cases, you must pick the soil by clicking on the soil name box and choosing one soil that best represents the field.
Soil Map Symbol (predominant): This column is automatically filled in with the dominant critical soil from the Soil Map Symbol (critical) column-the soil map unit appropriate for soil loss calculations. It should only be changed if the dominant critical soil is not the predominant soil because the predominant soil will be used to determine your fertilizer recommendations for the crop grown.
Soil Series Name (predominant): If you change the Soil Map Symbol (predominant), this will automatically update the Soil Series Name (predominant).
Field Slope (%): Field Slope should be field measured or can be obtained from a farm’s conservation plan. If field measurements are not available, the default values that fill in when the Soil is selected can be used. These values are typical for the soil mapping symbol. Default values should be field verified as soils are sampled or as field operations are done. Guidance on determining soil slope and slope length can be found at Choosing Critical Soil Type.
Field Slope Length (ft): Field Slope Length should be field measured or can be obtained from a farm’s conservation plan. If field measurements are not available, the default values that fill in when the Soil is selected can be used. These values are typical for the soil mapping symbol. Default values should be field verified as soils are sampled or as field operations are done. Guidance on determining soil slope and slope length can be found at Choosing Critical Soil Type. Note: Some fields created in SnapPlus version 1.119 and earlier might have the slope length in meters rather than in feet due to a problem in earlier soil look-up data. If you see slope lengths that seem shorter than they should be, click on the View menu and select Reset Farm Slopes and Lengths.
Below Field Slope to Water (%): Below Field Slope to Water can be estimated from a Soil Survey map using the dominant slope class of the soils mapped between the field and the closest down-slope to water. Note: The last capital letter in the soil map symbol indicates slope. Generally, A: < 2, B: 2% - 6%; C: 6% -12%, D: 12 -18%, E: > 18%; Ex.TaB2 has a slope in the 2% - 6% range. When you select certain ranges, field restrictions will automatically be selected and not editable on the Field Restrictions dialog box. See Field Restrictions Dialog Box on how to make these editable.
Distance to Perennial Water (ft): The Distance to Perennial Water is the distance from the down-slope edge of the field to the nearest water. It is not necessary to make exact measurements since the ranges in the drop-down list for this cell are very broad. Note: The Distance to Perennial Water (ft) column should be something other than 0-300 if the field is NOT next to surface water. When you select certain ranges, field restrictions will automatically be selected and not editable on the Field Restrictions dialog box. See Field Restrictions Dialog Box on how to make these editable.
Restriction Features: If the dominant critical soil selected for the field is an N restricted soil, the restriction code for that soil will be displayed in the Spreading Restriction Features dialog box. Go to Spreading Restrictions for more information on how to fill out this dialog box. Otherwise choose a soil from the dialog drop down list if your soil maps show the field contains an N restricted soil. Some non-agricultural soils are not in the list, and if the field contains one of these you should select Unlisted. If there are any field restrictions, click on the cell to open the Spreading Restriction Features dialog box to record the restrictions and notes. Go to Understanding Nitrogen Restrictions for more information. Note that you can automatically enter many of these restrictions if you use SnapMaps.
Tiled?: Check this box to indicate if the field is artificially drained. If this is a field with a soil with Poor or Very Poor drainage, checking this box may increase the amount of N recommended for corn. There are a number of Loamy soils with Poor or Very Poor drainage that were in the High or Very High yield potential category for corn prior to the 2012 A2809 updates, but now are listed as Medium yield potential due to drainage limitations. Artificial drainage's changes corn yield potential from Medium to High for Loamy soils that have no yield restriction other than Poor or Very Poor drainage. To view a Corn Yield Potential Changes by Soil Map Unit (SMU) spreadsheet, go to http://snapplus.wisc.edu/planning/nm-resources and click on the file.
Field Notes: The field notes should be used for other management notes other than restrictions. Click in the cell and an edit box will open in which to type your notes. Click on Accept when the notes are completed. Only the first few words will appear in the table on the screen.