SnapPlus Menu Items |

|

|
|
SnapPlus Menu Items |
|
|
SnapPlus Menu Items |
|
|
|
SnapPlus Menu Items |
|
|
The SnapPlus menu bar is located in the top left of the screen.
•Open SnapPlus farm: Opens a dialog box (the default location is saved in your settings when you last opened or created a farm) where you can select a farm to open. If the farm has recently been copied or is from a hard drive on a network, a warning message may appear about concurrent usage. •Recent: Displays the most recent databases with the most recent on top. To open one, just click on it. •New SnapPlus farm: Opens a dialog box where you select a folder and enter a new name for a farm, usually the farm's name, and then click on the Save button. •Save Snapshot: Allows you to save the database at a specific point in time which gives you the option to revert the file back to that point during a session if needed. By default, Save Snapshot saves a zipped database, with a timestamp appended to the name in the Backups folder in the same location as the farm database. •Revert to Last Snapshot: Allows you to go back to the latest saved snapshot (located in the Backups folder, in the same location as the farm database). •Get Previous Snapshot: Displays a list of previous snapshot date/times; select one to revert to it. These files are located in the Backups folder, in the same location as the farm database. •Archive: Meant for saving a farm database for historical/reporting purposes rather than just a backup. Archive saves a zipped database, with a timestamp appended to the name, in C:\SnapPlus2\MySnapPlusData\Archive. The Archive option gives you a secure means to save your end of year farm data. You may also save the file as a .snapDB file by setting the Save as type to "Farm Database (*.snapDb)". See How to Archive Completed Plans for Future Reference for more information. •Convert SnapPlus databases V1 to V2: Opens a dialog box that prompts you to select the source folder for the Version 1 database and destination folder for Version 2 --the default location of MySnapPlusData is already entered, but you can browse to a different location. Then click Convert to finish the process. The original Version 1 database will not altered or deleted. •Save Farm: Saves all of your changes to you farm file and leaves the farm open. •Close Farm: Saves all of your changes and closes the farm but leaves SnapPlus open. •Exit: Closes the program. |
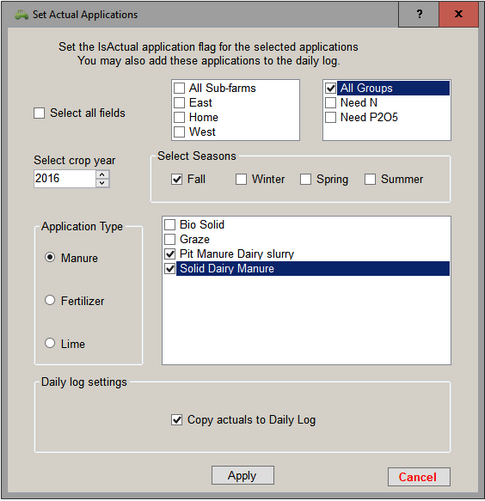
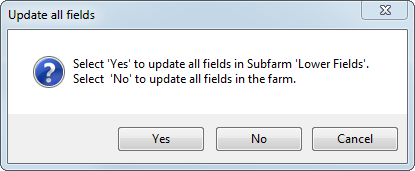
•Rotation Wizard: Adds/Edits cropping, application, rotational settings, MRTN data to multiple fields and years. •Rotation Editor: Brings up the Rotation Editor dialog box which allows you to add or edit the rotations used in the SnapPlus Rotation Wizard. You can use the Share function to save rotations that can be imported to any farm on your PC using Import/Export menu. •Manure Allocator: Allocates manure application to a group of fields you select with similar N, P2O5, and K2O needs. The average N, P2O5, and K2O needs for the fields are calculated using the Adjusted UW Recommendations (shown on the Cropping screen) for the fields in the year selected. See The Manure Allocator for more information. •Quick Fertilizer Blend: The purpose of this calculator is to determine a fertilizer blend given the fertilizer sources, formulations and the pounds needed. Up to three sources may be entered to calculate a blend. •Fertilizer Blend Calculator: Determines a fertilizer blend that may be used on a group of fields with similar N, P2O5, and K2O needs. Fertilizer blends for the fields are calculated using the Adjusted UW Recommendations (shown on the Cropping screen) for the fields in the year selected. See Fertilizer Blend Calculator for more information. •Easy Group Builder: Brings up the Easy Group Builder which allows you to create new groups based on the criteria of your choosing. You can also generate Excel spreadsheets with selected field data from this tool. See Using the Easy Group Builder for more information. •Update all fields: Forces a recalculation of nutrient recommendation for all fields and seasons and of rotation soil loss and P Index on all fields. You can abort a long model run by hitting the Escape key. If a Group or Sub-Farm is selected, you may choose to only update those fields or all of the fields in the farm.
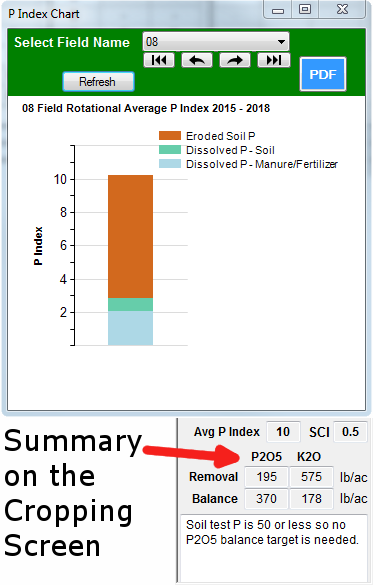
•P Index Chart: The P Index chart displays the rotational average P Index for a field in a stacked column chart. The stacked chart graphically displays the split up values of Eroded Soil P, Dissolved P from Soil and Dissolved P from nutrients that make up the total P Index value. The graph uses the data from the Rotational average P Index (Cropping Tab summary section) and is a graphical representation of that data. The graph is currently designed to view one field at a time, and there's an option to generate a PDF copy of the chart displayed. Click on the Refresh button to populate the updated P index results. The current graph scale is 0-10 and for P Index values greater than 10, the value is displayed in the chart.
•Split a Field: Creates a copy of a field in the database. After splitting a field, go to the Fields page to edit the Field Name, Size, Soil Map Symbol and any other field data that is not correct for the original or copied field. All soil tests and samples will be copied to the new field. Edit the sample lists on the Soil Test page so that soil samples are correctly assigned to each of the split fields. Split Field should be done on the desktop before you split the field in SnapMaps oHow do I split a field using SnapMaps? ▪On SnapPlus desktop •Split the field in SnapPlus •On the fields screen set the original field to active •On the SnapMaps screen oUpload oWebsite ▪In SnapMaps web •Use the split field tool to split the original field •Edit the new split fields to rename them to match the names you used on the desktop by selecting the names from the drop down list. ▪On SnapPlus desktop •On the SnapMaps screen oDownload oImport •On the fields screen set the original field to inactive •Merge Fields: Creates a new field combining the information from the fields you select. These fields must share a common boarder. Ensure the new field and field restriction data are correct. The fields you selected to merge will be set to Inactive. Before doing the merge, we suggest that you export the soil tests for the fields being merged. Select to export the Rotation Tests then select the current crop year for the Start Year and End Year. If the soil sample dates are not the same for all of the merged fields you may want to edit the export file to create a new combined soil test for the new field. Change the field name in the soil test export file so it matches the new field name then make sure all of the samples have the same test date and the sample names are unique. After the merge, import this soil test file and the merged soil test data for the new field will be created. oHow do I merge fields using SnapMaps? ▪On SnapPlus desktop •Merge the fields in SnapPlus •On the fields screen oSet the original fields to active oRename the new merged field to something that makes more sense to you •On the SnapMaps screen oUpload oWebsite ▪In SnapMaps web •Use the Draw Field tool to draw an outline around the original fields •Edit the new field to rename it to the merged field name by selecting the name from the drop down list. ▪On SnapPlus desktop •On the SnapMaps screen oDownload oImport •On the fields screen set the original fields to inactive •Utilities | Manage Snapshots: Has two choices for managing snapshots either by the number or by date: Snapshot purge limit of purge 30 and Select dates/times to delete. Change purge limit will let you set how many snapshots to keep. Select date will let you purge all the Snapshots that you select here. •Utilities | Pack Database: Performs a database Vacuum command which releases unused memory. This could make your database file smaller if you have been deleting a lot of fields, applications, or crop years. •Utilities | Clear Database Users: Purges the access data for the open farm keeping one month of records. |
|
•Cropping Grid Edit: Switches the Cropping screen between a one-field, all-years view and an all-fields, one-year view.
•Nutrient applications by season: Displays the total amounts planned or actual nutrient applications for each source by season. See Nutrient applications by season. •Preparer Info: Adds or edits information about plan preparers,contacts, and consultants. •Settings | Automatically open your last farm: When checked, this function opens the last farm that you worked on. •Settings | Auto purge: When checked, SnapPlus will automatically purge your backup files (snapshots). This means that no more than the last 30 file will be saved. •Settings | Confirm deletes: When checked, you get a confirmation box whenever you click on a delete option on a SnapPlus screen. When making multiple deletes, you will still be prompted to confirm the delete. •Settings | Check for version update: When checked, notifies you if a newer version is available. When you change from unchecked to checked, it will let you know if a newer version is available. •Settings | Field Grid Display: Speeds up refreshing the grid for large farms. •Settings | Show What's New: When checked, displays the section of the help file that shows new features. •Settings | Show Duplicate Farms: Searches for all the .snapDb farm files on your computer. •Settings | Reset Farm Slopes and Lengths: Is used only if you need to reset ALL field slopes and lengths to the default settings in for the designated dominant critical soil map unit. •Settings | Reset ALL default sizes: Resets the screen Size to 1024 x 731 and resets all of the grid columns to their default widths. •Settings | Reset grid columns to default widths: Resets all of the grid columns to their default widths. •Preferences: Lets you view where files and folders are located. Also sets the debug level for messages to be saved in the Syslog. |
•Help Contents: Brings up the installed SnapPlus help. •snapplus.wisc.edu: Goes to the SnapPlus website. •590 Restriction Maps: Brings up the Wisconsin Manure Management Advisory System website, which contains the 590 Nutrient Application Restriction Maps. Note that we recommend you use SnapMaps instead, as these websites are no longer maintained and their data is growing obsolete. •Reference Docs: Provides a means of viewing files in the SnapPlus/docs directory. The files available are listed when you make this menu choice. Reference documents include the current version of the 590, The 590 Nutrient Management Standard Technical Note, SnapPlus version history, and the Emergency Response Form. The references have been split into two groups : •Reference Docs (590, A to M) •Reference Docs (N to Z). Additional Import templates have been added here so they are easier to find.
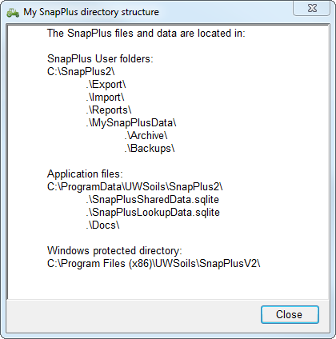
•Websites: Provides direct internet links to websites with important information for use with SnapPlus. The links are activated by moving your cursor over them and clicking. •Update SnapPlus V2: Checks if an update to your installed version of SnapPlus is available. If available, you can start the update right away if you wish, though you will need to close SnapPlus before the installation can proceed. •Directories: Opens a SnapPlus message window with a list of the SnapPlus installation directory structure. It will also list your default farm data, Import and Export directories if different from the defaults.
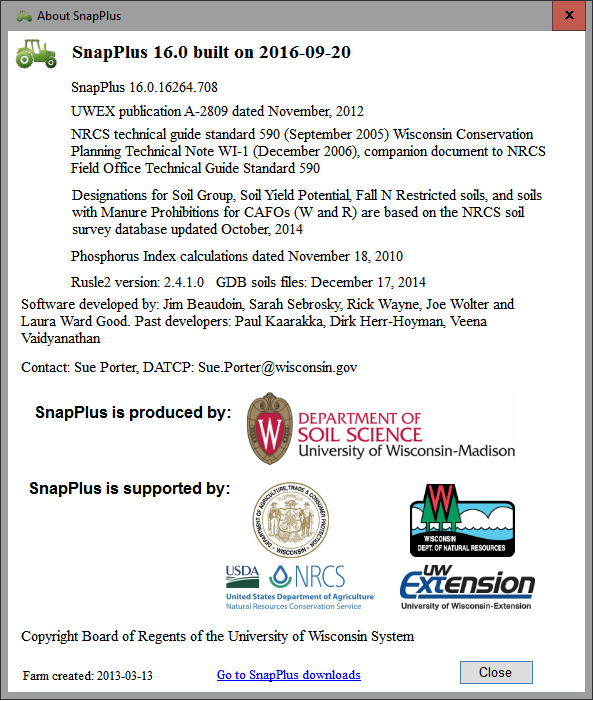
•About SnapPlus V2: Provides version and other information about SnapPlus.
|
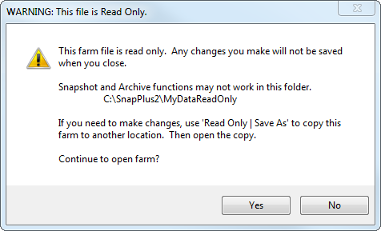
When you open a database which SnapPlus cannot write to, you will see a warning that outlines the limitations when working with a read only farm and the Read Only menu may become visible.
This can be triggered by two situations: •Read only files oAdministrator sets the file to read only oOpen a SnapPlus database from an email attachment •Archives - Open a SnapPlus .zip archive and double click on the archived farm. oArchived .zip files saved on your computer oArchived .zip file sent as an email attachment If you continue to open the read only farm, you’ll notice that the green bar at the top of the screen turns red and file name is preceded by READ ONLY. There there may also be a Read Only menu. This menu may not appear when opening the database from an email attachment, and will not appear when opened in a zip archive.
It is not recommended to use a database in read only mode. Any changes made are not saved, automatic backups may not occur, and there may be performance issues. Navigating between tabs and opening the file may take a significantly longer than usual. To use a read only database a copy should be made. Doing so will not affect the original database. Note: When copying the database, remember that the default location for SnapPlus databases is: "C:\SnapPlus2\MySnapPlusData". •Read Only menu is present: Open the Read Only menu and click Save As. This will open a save dialog box. Navigate to where you want to create a copy of the farm and click Save. •Zip Archive: Open the zip archive and click Extract all files in the upper left of the window. This will open the extraction dialog box. Click Browse and navigate to the folder where you want to create the copy. Then click OK and then Extract to create the copy. You can also copy or drag the file out of the zip archive to create a copy. •Email Attachment: When opening the given attachment, look for an option to Save instead of Open. This will allow you to choose the location on your computer for a copy of the attachment.
|